Java Persistence Api
![]()
Two lab work sessions are necessary to achieve this subject.
1. Introduction
Java Standard Edition includes an API for the persistence: Java Persistence Api (JPA). JPA allows
Object Relational Mapping (ORM): the aim is to synchronize java objects with a database.
Technologies:
– Gradle
– Eclipse JEE developper
– Spring framework
– Eclipse Link as a JPA provider – HSQLDB database server. Source code for a basic example is
at:
https://github.com/charroux/JPABasis-master
This project defines a JPA class for a Person, and a basic main program that store a person inside a data base.
Download this project and study how JPA is used.
2. A car rental service
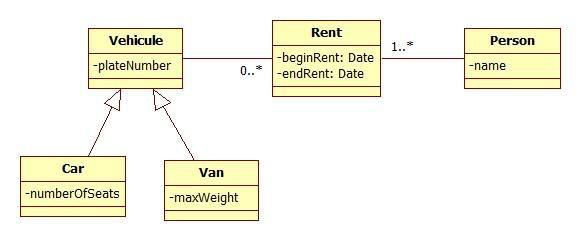
The system to be designed is composed of 4 classes.


3. Java and Eclipse project creation
The given project is a Gradle project. The file build.gradle contains all the required libraries, mainly:
compile group: 'org.eclipse.persistence', name: 'javax.persistence', version:
Page 1
![]()
'2.0.0'
compile group: 'hsqldb', name: 'hsqldb', version: '1.8.0.10' compile group:
'org.eclipse.persistence', name: 'eclipselink', version: '2.5.1'
Use Gradle commands (from the project directory) to install libraries and convert the project into an Eclipse project : gradle build gradle eclipse
Import the project into Eclipse: import -> general -> existing project into workspace …
As a database server, HSQLDB is used:
http://hsqldb.org/
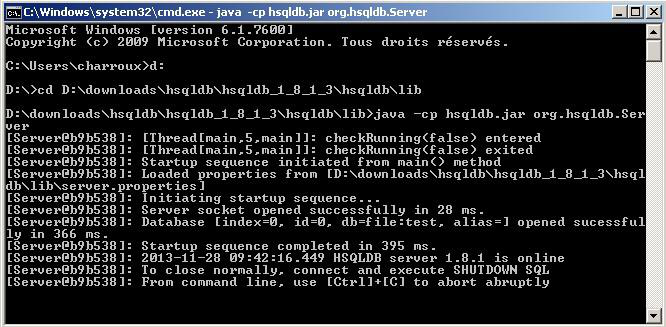
Download version hsqldb_1_8_1_X (don’t use the version 2.x), uncompress the file. The server can be started as follow (be sure to type this command into the HSQLDB’s folder:


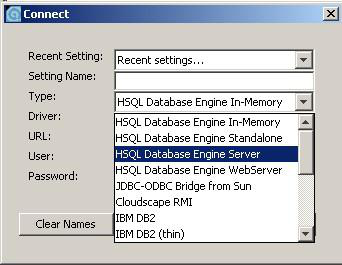
A basic database manager can be launched using:


Page 2
![]()

It allows querying the database.
Eclipse Link is used as a JPA provider (http://www.eclipse.org/eclipselink/). JPA needs a folder named
META-INF containing the file persistence.xml:
This file must contain the list of persistent classes:
4. JPA classes
Using JPA, write the classes depicted in the above class diagram.
You should be able to store java objects into the database, but also to query the database.
5. Integration into a REST Web Service
During lab works about Web Services you have implemented a Rest Web Service for car rental. The work to be done is now to integrate the JPA classes into the Web Service project.
Complete the file build.gradle from the Web Service project with information from the build.gradle file for this project.
The class CarManager from the Web Service project is useless since JPA defines an Entity Manager.
All the JPA classes will take place into the model package.
You should add new DTO classes matching the model classes.
As a client, you can adapt the Java client or the HTML + Java script client.
Page 3
![]()
Asynchronous communications between programs with ActiveMQ
![]()
Introduction
Message broker is an intermediary program module which translates a message from the formal messaging protocol of the sender to the formal messaging protocol of the receiver. Message brokers are elements in telecommunication networks where programs (software applications) communicate by exchanging formally-defined messages. Message brokers are a building block of Message Oriented Middleware (https://en.wikipedia.org/wiki/Message_broker ).
Apache ActiveMQ is an open source message broker written in Java together with a full Java Message Service (JMS) client. It provides "Enterprise Features" which in this case means fostering the communication from more than one client or server. Supported clients include Java via JMS 1.1 as well as several other "cross language" clients. The communication is managed with features such as computer clustering and ability to use any database as a JMS persistence provider besides virtual memory, cache and journal persistency (https://en.wikipedia.org/wiki/Apache_ActiveMQ ).
Installation procedure
Before downloading ActiveMQ, check the Java version installed on your machine (JDK 1.6 is recommended but higher version should work).
Set if necessary the environment variable JAVA_HOME (it must point to a valid JDK root directory).
Download Apache ActiveMQ binary version (version 5.x.x is recommended): follow the link http://activemq.apache.org/ .
Uncompress the archive file.
Start ActiveMQ with the following command:
bin\activemq start
(you must be in the parent directory of bin).
Configuring Queue and Topic
Start the web console: http://localhost:8161/admin
Default user name: admin
Default password: admin
Create a Queue, and a Topic.
Before starting coding answer the questions: what is a queue? What is a Topic?
Project creation
Download a template for your project at https://github.com/charroux/ActiveMQTemplate .
This is a Gradle project.
Use the commands gradle build and gradle eclipse to download the required libraries and to convert the Gradle project into an Eclipse project . Import the project into Eclipse.
Coding
The given code contains only:
– Creation of a queue and a topic (see src/main/resources/applicationContextJMS.xml)
– Skeletons for accessing a queue in Java (see src/main/java)
Work to be done: study the slides of the course JMS API and complete the code to send messages from one sender to one receiver (using a queue and a topic).
Is a queue able to receive message from many senders?
Is a queue able to send message to many receivers?
Write code to test what is possible.
Is a topic able to receive message from many publishers?
Is a queue able to send message to many subscribers?
Write code to test what is possible.
Advanced message sending
Code each possibility of message sending:
– Persistent mode
– Time to live
– Priority
Try to transmit messages into a transaction.
Angular
![]()
Angular?
Angular allows to build applications and reuse the code and abilities to build apps for any deployment target: for web, mobile web, native mobile and native desktop.
Installation
Angular requires:
– Node.js (an open-source, cross-platform JavaScript run-time environment for executing JavaScript code server-side)
– Npm (a package manager for the JavaScript programming language)
See https://angular.io/guide/quickstart
Starting with an existing application
A template for a project is given at: https://github.com/charroux/CarRental
Download and unzip this project.
In the project folder install the required module using the command line: npm install
Then start the server with: ng serve
Display the user interface into a web browser at: http://localhost:4200/
Tools
Many tools are available. Among them Eclipse provides a plugin for angular:
https://marketplace.eclipse.org/content/angular-eclipse
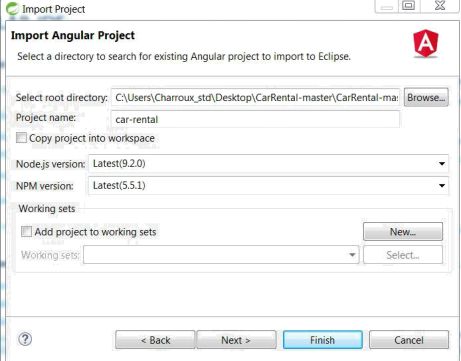
Install the plugin then import your project into Eclipse:
– As an Angular Project
– Chose the version of Node.js and npm according to your local installation (retrieve which version is installed using node – – version and npm –version)

Work to be done
Add the link "Get back a car" into the main page:
A click on this link should display a menu:
When a car is selected the page should look like this:

Integration with the Rest Web Service
The given project is provided with a class simulating the web service:
https://github.com/charroux/CarRental/blob/master/src/app/mock-cars.ts
Delete this class and use the http client library into the Service class to access the Rest Web Service:
https://github.com/charroux/CarRental/blob/master/src/app/car.service.ts
